Using Virtual Environments - Node.js
In a previous post I postulated virtual environments as a solution to the problem of dependency and version collision for software built using languages like Python, Ruby, Node.js, and Go.
In this post I give the details and some examples of using a Node.js virtual environment. First I walk through everything using OS X—i.e., using a Mac—and then I describe the same procedures using Windows.
This time, instead of breaking the work into two posts, I’ll try to work it all into a single post (made possible by skipping direct inspection of the automation scripts).
- About Node.js
- Node.js installation (OS X)
- Node.js virtual environments
- The example
- Automating virtual environment management
- Why not nodeenv, nave, nvm?
- Script source code
- Automating the creation of the virtual environment
- Automating the activation of the virtual environment
- Automating the provisioning of the virtual environment
- Automating a working script that uses the virtual environment
- Node.js on Windows
About Node.js
The README accompanying the source code of Node.js 4.4.2 gives this overview:
Node.js is a JavaScript runtime built on Chrome’s V8 JavaScript engine. Node.js uses an event-driven, non-blocking I/O model that makes it lightweight and efficient. The Node.js package ecosystem,
npm, is the largest ecosystem of open source libraries in the world.
JavaScript was a language designed and built to run in web browsers. The Node.js project has taken the core JavaScript language and made it available as a general purpose application language and runtime. Typically, node applications are used for backend services of a website or web application, but they are also used for a variety of development utilities executed from a command line or in a shell script.
Node.js installation (OS X)
Security concern
As of this writing (circa April 2016), there are four major releases of Node.js being maintained: 0.10, 0.12, v4, and v5. Whichever you are using, you should be certain you are using a version of that release that was distributed on or after 31 March, 2016; there was a serious vulnerability in npm in earlier versions that you definitely want to avoid. See this Node.js blog entry for details: https://nodejs.org/en/blog/vulnerability/npm-tokens-leak-march-2016/. See also this npm blog entry: http://blog.npmjs.org/post/142036323955/fixing-a-bearer-token-vulnerability.
This table identifies the minimum Node.js distribution to be using for each major release:
| Release | Minimum safe version |
|---|---|
| v0.10 | v0.10.44 |
| v0.12 | v0.12.13 |
| v4 | v4.4.2 |
| v5 | v5.10.0 |
Installing specific versions on OS X
Although I favor package managers like Mac Ports for many things, sometimes you need more control over what is laid down on your system, and what remains in place when picking up newer versions of software (e.g. Node.js and Ruby).
For node.js, I don’t like to use Mac Ports or the installers provided by the makers of Node.js. My main requirement is to have a base installation of a set of Node.js versions from which I can create local, project-specific, virtual environments. Mac Ports installs always the latest stable version of node (at the moment that is v4.4.2)—but what if I want to create a v0.12-based virtual environment or try the bleeding edge v5? No, the only way (unless there is an rbenv equivalent for Node.js) is to manually maintain a set of releases on my system.
I follow the well-worn path for side-by-side installations of putting all the base (or global) installations of Node.js under the directory ~/Library/Frameworks in a sub-directory named node.framework. Mac Ports does something similar for Python, sticking the various versions of Python in /opt/local/Library/Frameworks/Python.framework. For Node.js I put the tar.gz installation archives in the node.framework directory and, optionally, unpack the ones I want to use for non-virtual purposes into a Versions directory.
To support the virtual environment mechanism I’m describing, download and save the tar.gz file for every version of node you want to create virtual environments from.
For example, currently on my system the ~/Library/Frameworks/node.framework contains:
Versions/0.12.7/- node-v0.10.44-darwin-x64.tar.gz
- node-v0.12.13-darwin-x64.tar.gz
- node-v0.12.7-darwin-x64.tar.gz
- node-v4.4.2-darwin-x64.tar.gz
- node-v5.10.1-darwin-x64.tar.gz
I use the v0.12.7 version for non-project Node.js purposes. Clearly I’ll need to move that to v0.12.13 (because of the security issue mentioned above).
You can download Node.js release and source code here: https://nodejs.org/en/download/releases/
Example: Installing Node.js 0.12.13 on your system
This example is not about installing Node.js as a project virtual directory. This is just about installing a version of Node.js for normal system use; installing a global version of Node.js.
- Go to https://nodejs.org/en/download/releases/ and download
node-v0.12.13-darwin-x64.tar.gzinto your~/Library/Frameworks/node.frameworkfolder. cdinto~/Library/Frameworks/node.framework/Versions; make that directory if it doesn’t exist.- Unpack the distribution with the command
tar xzf ..\node-v0.12.13-darwin-x64.tar.gz - rename the sub-directory
node-v0.12.13-darwin-x64to0.12.13.
Using this global installation of the Node.js v0.12.13 distribution is simply a matter of making sure that 0.12.13\bin\node and 0.12.13\bin\npm are found via the path.
The tar.gz archive can be left in place so that it can be used by the virtual environment mechanism I describe below.
Node.js virtual environments
The example
Before diving into the creation and automation of a Node.js virtual environment, I want to pick a real world example that requires Node.js and an npm package. Assume that we are working with a website application similar to the example used in the discussion of Python and Ruby virtual environments. But in this case we aren’t using Node.js on the website in production; instead, we want to use Gulp to automate build, test, and deployment tasks associated with the website development. Gulp is a Node.js application and uses a number of npm packages, node modules, so it is a reasonable example.
The example scripts will provision the virtual environment with gulp and some supporting plugins, like gulp-autoprefixer and gulp-cached.
Automating virtual environment management
When working on a project I don’t want to fumble around trying to figure out how to create a virtual environment with the correct version of Node.js and provision it with the needed npm packages at the required versions.
What I want is to be able to pull a fresh source tree from source control (GitHub, Atlassian, a private server) and:
- run a script that automatically creates the correct virtual environment,
- run another script to activate the virtual environment,
- run another script to provision the virtual environment with the
npmpackages required by the project.
I also want my command prompt to indicate that a virtual environment is active, and I want:
- a script to deactivate the virtual environment, and
- a script to upgrade gems to pick up compatible patches and updates
These scripts should validate that the correct and complete environment expected is in place before taking any actions to modify or manage that environment.
Except for the provisioning and upgrade scripts, those capabilities should be considered standard features of virtual environments. For a clear statement of the principle requirements of a virtual environment see “Package management automation”.
Why not nodeenv, nave, nvm?
Instead of making a bespoke mechanism for Node.js virtual environments, why not use one of the tools that attempt to manage a node virtual environment. For example, why not nodeenv or nave or nvm?
nodeenv depends on Python 2 (and make, and other things). I’d prefer not forcing these extra dependencies.
nave uses subshells; that is, it always creates a new shell to run some command and then exits the subshell. That doesn’t give one a “native” experience using node and npm, and seems awkward and probably will break some scripts and use cases.
nvm seems to manage multiple versions but on a global basis. That is, you can switch between versions, but if you install packages in v4.4.2 then all projects in which you use nvm will see the new packages. That’s not the kind of behavior I’m looking for in a virtual environment mechanism. However, nvm is the most commonly used utility for managing “side by side” node on a system, and probably deserves more careful consideration than I’ve given it.
These are all interesting projects and worth watching and experimenting with. But I think what is ultimately needed is some mechanism built into the language—like venv is built into Python 3. Until then—and until the official installers support side-by-side installation—I think it is easier to just put a copy of the relevant version of node.js into a sub-directory of the project and switch the Path environment variable to point to that.
I’ll keep watching nodeenv, nave, and nvm. And I’ll keep an eye out for other Node.js virtual environment managers. But for now, simpler seems better and the approach I describe below is very simple.
Script source code
I’ve made the example with all the scripts in this post available in a GitHub repository called using-virtual-environments. Use git checkout example-node012 for the Node.js v0.12.13 example files, and git checkout example-node44 for the Node.js 4.4.2 example files. There are some scripts in that repo that I won’t discuss, like the scripts that contain helper functions (like functions to parse and compare version strings); the full set of scripts may be worth investigating on your own.
Automating the creation of the virtual environment
On OS X, the script to make the virtual environment is called make-venv.sh. It is quite straightforward. It performs the following steps:
- Check whether a Node.js virtual environment exists
- If not, check whether a
tar.gzdistribution exists; install it to a local directory in the project directory tree - Check whether the Node.js virtual environment contains the expected version of Node.js
Take a look at nodejs/make-venv.sh from the example-node012 branch of the Git repo). Notice that the local directory is .jslcl.1
Automating the activation of the virtual environment
The script to activate the virtual environment performs these steps:
- prepends the path to the Node.js binaries to the $PATH environment variable
- adds
(js)to the command prompt to signal that a Node.js virtual environment is active - creates the deactivation script
- creates an alias
deactivate-venvto invoke the deactivation script
This script must be executed using the source command:
$ . nodejs/activate-venv.src
Take a look at nodejs/activate-venv.sh from the example-node012 branch of the Git repo).
Automating the provisioning of the virtual environment
The script to provision the virtual environment performs these steps:
- Check that the Node.js virtual environment is active and running the expected version of Node.js
- Go through a list of
npmpackages, checking whether an acceptable version is installed. For any not installed, install them.
Take a look at nodejs/provision-venv.sh from the example-node012 branch of the Git repo).
Automating a working script that uses the virtual environment
Scripts in the project that leverage Node.js will need to check whether the Node.js virtual environment is activate and properly provisioned.
Take a look at example-task.sh from the example-node012 branch of the Git repo). That script does all the necessary checks before allowing the actual work intended by the script.
Node.js on Windows
Using Node.js on Windows systems is problematic. Even more so if you want to manage node as a virtual environment. Some issues2 include:
- Official install kits permit only one version of Node.js on a system. Installing a newer version will remove the older version
- Windows path lengths cannot exceed 260 characters. Actually they can, and will (thanks to
npm), but many native CLI and GUI programs will break if the absolute path of a file or directory exceeds 260 characters. - Even with a workaround for the side-by-side installation and the path length limit, there is still one common location for global module installation.
- The
npmcache is global … it cannot be restricted to a project’s local directory tree. npminstalls binaries associated with packages intonode_modules\.binrather than into the location wherenode.exelives.
All of this makes working with Node a bit awkward on a Windows system. The virtual environment mechanism I use has workarounds for almost all those issues. But if the workarounds are not compatible with your project, then you probably need to think about spinning up project specific virtual machines (using Hyper-V or VirtualBox, for example).
Installing Node.js (Windows)
The goal of this installation is to make a source image of a particular version of Node.js available for virtual environment creation. This is not intended to install Node.js for general or global use.
Note: this method works around the “lack of side-by-side installation” issue.
- Download the Node.js installer for the release of interest. Note whether it is a 32-bit (x86) or 64-bit (x64) install kit.
- Run the installer
- When prompted for a destination path, choose:
C:\Program Files (x86)\nodejsif installing a 32-bit release, orC:\Program Files\nodejsif installing a 64-bit release.
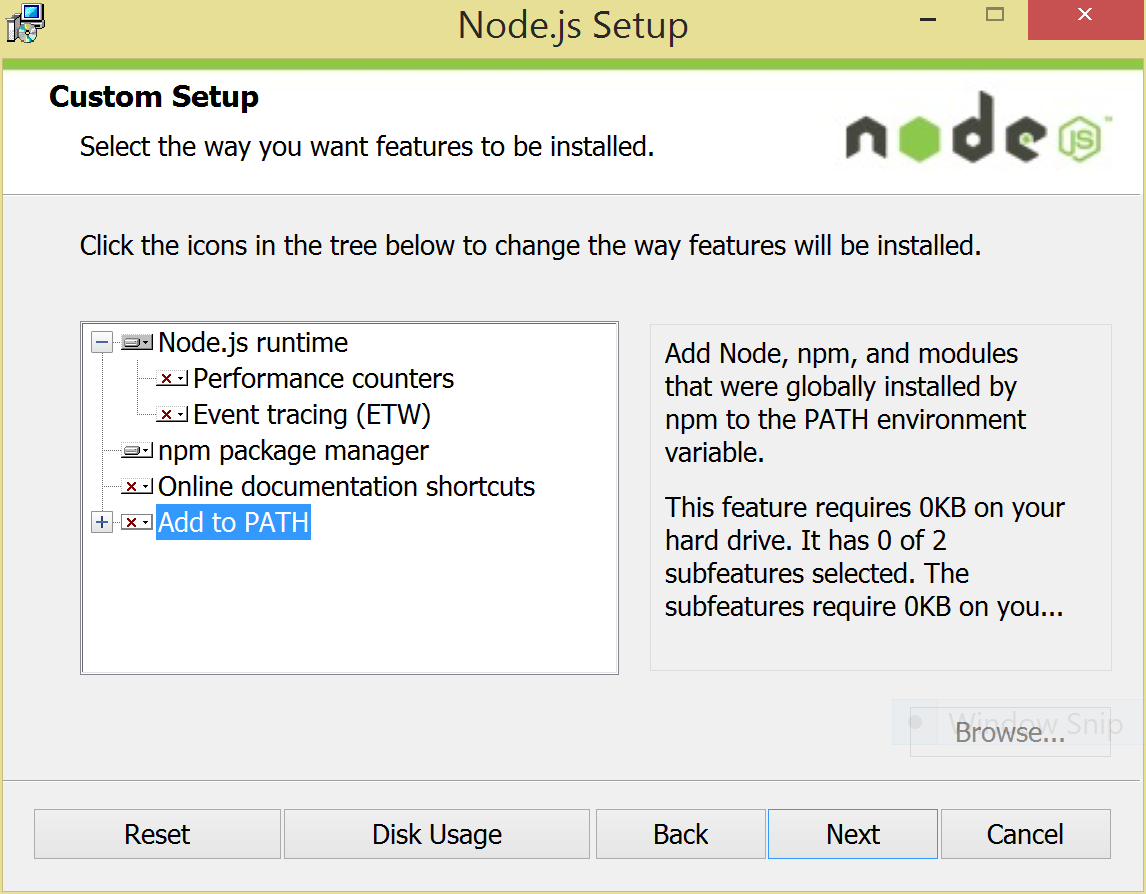
-
When at the “Custom Setup” panel, make sure only Node and NPM are installing, not any other features or subfeatures (e.g. don’t add to PATH or register events). Here is a screenshot of a properly configured custom setup panel.
- After the installation is completed, copy the installed software to a version specific folder within the same parent. For example:
- copy
C:\Program Files (x86)\nodejstoC:\Program Files (x86)\nodejs-0.12.13, or - copy
C:\Program Files\nodejstoC:\Program Files\nodejs-4.4.2.
- copy
- Uninstall Node.js to remove the software installed to the
nodejsdirectory.
Now you’ve got a pristine installation image of a particular version of Node.js that you can use as a source for multiple Node.js virtual environments.
All these issues are addressed below
The long path names is only an issue if you are trying to delete your project, or the local NPM install folders. To delete long things you will have to use the subst to create a drive letter mapped to partway into the long path.
Automating the Node.js virtual environment (Windows)
As mentioned above, I’ve made the example with all the scripts in this post—including the Powershell scripts for Windows—available in a GitHub repository called using-virtual-environments.
The make-venv.ps1 script will install the virtual environment for a specific version of node by copying the pristine installcation image into a local .jslcl folder for the project—first checking whether .jslcl already exists and contains a valid virtual environment.
The activate-venv.ps1 script will check for a valid virtual environment local directory (i.e., a valid .jslcl directory) and will then add the .jslcl subdirectory to the path as well as the node_modules\.bin subdirectory to the path. Then it will prefix the command prompt with “(js)”. Finally it will create a deactivation script deactivate-venv.ps1 that should be used to deactivate the virtual environment (remove the virtual environment from the PATH and remove the command prompt prefix).
The provision-venv.ps1 script will install all the npm packages upon which the project depends. This script only installs packages locally, not globally. (Note: this avoids the issue of having a common global package installation location. That is, avoiding global packages avoids dependency conflicts between different instances of Node.js virtual environments).
So, when you download a fresh source tree from the source control repository, you only need run:
make-venv.ps1activate-venv.ps1provision-venv.ps1
And you’ll have a fully provisioned and active Node.js virtual environment ready for your project to use.
Also, take a look at the example script example-task.ps1 for an example of a project task script (such as a build or test script) that validates the Node.js virtual environment before performing any work.
_Note: putting node_modules\.bin into the PATH works around the issue of package binaries being placed in a different location that Node.js binaries on Windows systems.
Removing the Node.js virtual environment (Windows)
Note: these procedures work around the 260-character path length limitation.
The easiest way to remove the virtual environment is to first remove all the npm packages. And example script clean.ps1 is provided as a way to automate that process. I recommend creating such a script and adding it to source control3—along with the make-venv.ps1 script and the other virtual environment automation scripts. Even if the path lengths to node modules are longer than 260 characters, the npm uninstall command will be able to delete the files.
After deleting all the npm packages, then the node_modules subdirectory should be removed. If it is still there, probably more node modules exist. Run npm list to find out. Delete the remaining modules until npm list is empty.
Once that is done, then you should be able to finish removing the virtual environment by:
- running the deactivation script,
- deleting the
node_modulesdirectory if still present, and - deleting the
.jslcldirectory.
If you just try to delete the node_modules without uninstalling via npm then you will likely get an error because the path length to some node module is too long. See http://superuser.com/questions/755298/how-to-delete-a-file-with-a-path-too-long-to-be-deleted for a solution to that problem. But try to remember to uninstall npm packages before deleting directory; it is a whole lot less trouble.
In sum (Windows)
The above procedures and automation scripts mitigate these issues developing with Node.js on Windows:
- lack of direct support for Node.js virtual environments
- lack of side-by-side installations of different versions of Node.js
- path length limitation of 260 characters for much of Windows
- common global installation location for
npm
Given all that, I think most Node.js projects could take advantage of a virtual environment on Windows systems.4
-
This name avoids conflict with
.rblcl, which is what I used in the virtual environment mechanism on Windows. Eventually I want to have simultaneous virtual environments for a project: concurrently active virtual environments for Python, Ruby, Node.js, and Go. ↩ -
See also Node considered harmful (on Windows). ↩
-
And keep it in sync with the provisioning script. ↩
-
If not, there’s always Bash on Windows. ↩
- show comments